How To Apply Painters Caulk will be the topic of our conversation on this particular occasion. There is, without a doubt, a great deal of information pertaining to Do You Caulk Around Window Trim Inside available on the internet. As a result of the rapid development of social media, it is now much simpler for us to acquire new information.
There is a connection between the pieces of information pertaining to how do you apply painters caulk, How To Apply Caulk, and how to painters caulk. Regarding the other items that need to be searched, one of those things is concerning Caulk Before Or After Painting, which will also have something to do with How To Remove Caulk Residue.
56 Tips to How To Apply Painters Caulk | How To Remove Caulk From Shower
- We hope you find all this information about caulking useful. Ecopainting painters are trained to perform prep work as per industry standards. Feel free to contribute to this blog and ask any questions, in the comments below. - Source: Internet
- The next step for removing silicone caulking from a tub enclosure or shower stall requires a little elbow grease and a few safety measures. To remove caulk, you will need a sharp blade, putty knife, or utility knife. Also, you’ll need to wear thick gloves to keep your hands protected. - Source: Internet
- Silicone is not as hard as Butyl rubber. It can be softened with just a hairdryer. Least damage upon removal: Another advantage of silicone caulk is that it is not as permanent as the other varieties. That is why even the weaker structures with the caulk can endure a thorough removal. - Source: Internet
- What does “elastomeric” mean? The term elastomeric refers to the ability of a material to stretch and then return to its original shape, i.e., it has “memory.” Elastomeric caulks are normally the better choice and an excellent choice with any kind of paint. - Source: Internet
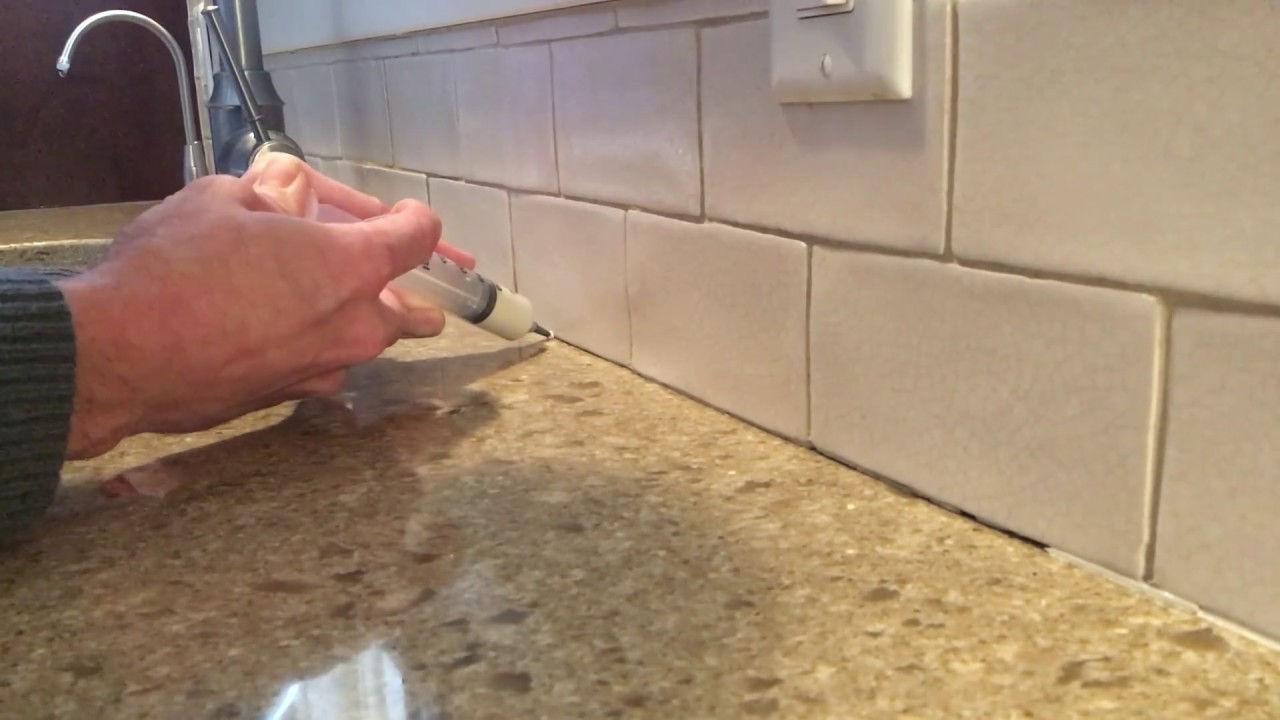
- The cartridge of caulk you buy from the hardware store isn’t designed to double as a tool for direct application. You’ll need a good quality caulking gun to dispense it properly. When shopping or a caulk gun, look for a model that has a comfortable grip and a smooth plunger rod. - Source: Internet
- Now use your finger to lightly smooth the caulk into the crack. Go one direction, pulling your finger across the surface of the baseboard. Wipe the excess caulk off your finger with a paper towel or wet rag. This may seem messy at first, but it won’t take long till you know how much pressure to put on the trigger of the caulk gun to get the right amount of caulk out, which will decrease the excess coming off onto your fingers. - Source: Internet
- Use heat or alcohol to soften the caulk. Leverage it with a sharp knife or fine pliers and remove the layer. Use a sanding paper or a brush to remove the final traces. - Source: Internet
- Polyurethane – Polyurethane is produced by glycol and isocyanate. It’s liked for its moisture and corrosion-resistant qualities. It is a strong adhesive, sealant, and caulk. It’s also flexible. When joints expand and contract, polyurethane caulk resists cracking and loosening. - Source: Internet
- TIP: If you’re planning to re-caulk a tiled shower or bathtub wall, deep clean the tile before you remove the old caulk. Soap scum and other surface grime can inhibit the caulk’s ability to adhere. You don’t want water to get behind the tile and into your wall, which can create a nasty mold and mildew problem. - Source: Internet
- This caulk is rarely used for windows unless a metal window’s frame has a significant exterior gap. In such an instance, construction caulk will be used to fix the gap between the frame and the brick nearest to it. This isn’t the easiest to remove, and you can expect nothing less than a heat gun to work here. - Source: Internet
- Paint cracking around caulk joints The paint most prone to cracking over newly applied caulk is a cheap interior flat Latex. If you use this paint, there is no room for error, and the caulk must be allowed to fully dry (overnight) before painting. Premium paints do not have this same problem, and seem to have less cracking issues over newly applied dry caulk. - Source: Internet
- Help with Drying Time Our specially formulated caulks offer standard, faster, and slower dry time options. We have a caulk that meets your job needs ranging from the cool Northeast, to the humid Southeast, to the dry Southwest, and the moist Northwest. We provide solutions to keep you painting through all climates and conditions. - Source: Internet
- Wash your hands with soap and water when you’re finished. Depending on how much caulk was used and how big the gaps are that you are sealing, the caulk should be dry after a couple of hours. If you’re in a big hurry you can paint over wet caulk, but it’ll look best if you give it time to dry. - Source: Internet
- Now you need to poke a hole in the tube of caulk, or it won’t come out. There’s a small piece of wire on the caulk gun that swivels out from below the shaft. Take this piece of wire and insert it through the tip of the caulk until you feel it puncture the tube. Do this a few times. Wipe off the wire when you pull it out, or you’ll get caulk all over your hand while you are using the gun. - Source: Internet
- Because of the newer chemical makeup of paints, some have lost a lot of their elasticity. Contract and vinyl matt emulsion is particularly brittle and cracking over caulk when using this type of paint is common. Caulk has always had anything from a 4-15% shrinkage rate while drying and the general formula in caulks haven’t changed much over the years, yet the paint has. - Source: Internet
- Interior caulking is used around kitchen countertops, bathrooms and around tub and shower enclosures. Preventing moisture from entering in gaps, this type of caulk has additives to stop mould from developing in humid environments. More often than not, silicone is used in kitchens and bathrooms. Silicone offers better adhesion and allows for more flexibility. Unfortunately, silicone is not paintable and therefore not very popular with painters. - Source: Internet
- Windy days are also not ideal for doing exterior caulking. The wind can cause dirt, leaves, and other debris to blow onto the still wet caulking, stick to it, and then dry right into the caulking. Nobody wants an exterior wall or window seams covered in dirt and leaves that are essentially impossible to remove. - Source: Internet
- Put the tube of caulk into the shaft of the gun and pull the trigger until you feel it meet some resistance. Place the tip of the tube on the crack you want to fill and gently pull the trigger of the gun as you pull the tube across the crack. You want a small, thin, uniform line of caulk over the surface of the crack. You should be continuously moving the caulk gun, not staying in one spot. You don’t want a large blob of caulk in one area. - Source: Internet
- Step 4. Clean the surface using alcohol. Then kill any mold or mildew with a mixture of 1/3 cup bleach to 1 gallon of water. Allow to completely air dry (again, patience) before applying new caulk. - Source: Internet
- The whole point of caulking is to create a seal that does not allow moisture in. If you have a bunch of cracks and gaps in your walls, and they aren’t all sealed, the existing caulking that you do have will be rendered totally useless. If water can get in, it needs to be caulked. - Source: Internet
- To prep for new caulking, use a cleaning solution to remove caulk residue from the surface. Bleach or mineral spirits work best. These cleaners will remove residue that could prevent the new caulk from sticking. - Source: Internet
- Insert the caulk tube in the caulking gun and pull the trigger until the plunger is snug against the bottom of the tube. Cut the nozzle tip of the caulk tube at 30 – 45 degree angle to the desired thickness of the caulk bead (don’t cut it too big). Puncture the inner seal of the nozzle if needed. - Source: Internet
- While the caulk is an excellent sealant to keep dust and water out of cracks and gaps in your windows, you do not want to let it stagnate. Every two years or so, depending on the climate, you should remove old caulk using the methods in the article and apply new layers. Here’s a recap of the steps you must take to do this: - Source: Internet
- The quality of interior caulking is not evaluated by the flexibility alone. Sealants for interior painting must be easy to apply and tool, and they have to be paintable. When speed is of the essence, quick drying and curing times can speed up the job of the contractor. - Source: Internet
- Although this may not always be possible, if you can, don’t apply caulking in direct sunlight, or where direct sunlight will hit shortly after applying the caulk. Direct sunlight, when it hits caulk that is not yet dry and cured, can cause it to dry too quickly and to shrink. It can also lead to a much weaker bond, and it may cause your caulking to crack. - Source: Internet
- The 10-ounce tube of caulk has a pointed tip. Use a utility knife to cut the tip diagonally at the very end. You want the hole to be small, so don’t cut lower down the tip where the opening gets wider. - Source: Internet
- If you want to improve the overall appearance of a paint job, it’s a good idea to caulk between the walls and trim moldings to fill any gaps before applying the finish paint. Take care when choosing your caulk to use a paint-able acrylic latex or silicone enhanced acrylic. Don’t use pure silicone for painting, it tends to repel both latex and oil-based coatings causing them to separate while wet and to peel when dry. Pure silicone should only be used for non-painted surfaces like tubs, showers, and tile or for weather-proofing to block drafts. Check here for a video demonstrating how to caulk trim and - Source: Internet
- The wider that hole is, the more caulking will come out at once, and the wider the bead will be. In most cases, you want that tube opening to be small, as this allows for much more precision when applying caulk. It will help prevent you from making a mess. - Source: Internet
- Yet another big mistake that many newbies make is to caulk over the weep holes in windows. These weep holes are designed to let windows breathe, so to speak. They allow moisture to get out. If these weep holes are covered, the window frames may rot. - Source: Internet
- Caulking is a relatively easy painting skill that will make a vast improvement in the quality of your paint job. We highly recommend you don’t skip this step the next time you’re painting a room. We hope that this post helps you feel more confident about trying to use caulk if you never have before. Let us know if you have any questions. We’re always happy to help! - Source: Internet
- Sealing Crown Molding Decorative molding demands the best caulks that have great adhesion and flexibility. Crown molding expands and contracts due to the temperature differences in rooms. Temperatures can differ up to 15 degrees from floor to ceiling, and crown molding must endure the greatest temperature movement. Use only high quality elastomeric caulks for this application. - Source: Internet
- Silicone caulking is a popular home construction material. Before caulking, sealants were rudimentary and consisted of mud and woven grass. A few decades ago, silicone caulking emerged. - Source: Internet
- Caulking can take quite some time to dry and totally cure, sometimes 24 hours or more. In order for caulking to dry properly, the environment must also be dry. Simply put, there is no chance that the caulk will dry properly in excessive humidity or if it is being rained on. - Source: Internet
- With a portable heater or hair dryer, apply heat directly to the existing caulk. The heat will soften it, making it easier to remove. Use the lowest heat setting available to prevent the caulk from melting. - Source: Internet
- One thing which can amplify the problem is caulk not being fully dry before you paint over it with emulsion. Even though the surface may seem dry, even if it has been left overnight, it may still have some shrinking to do. Therefore, when painting over it, the paint film dries and then shortly after, the caulk continues shrinking, pulling the paint film apart and leaving cracks on the surface. This is why you don’t have a problem when using soft sheen/vinyl silk/masonry & glosses etc, as they are flexible and they move with the caulk, so doesn’t split. - Source: Internet
- Caulking is not overly difficult to apply, and it is of course a really convenient thing. You can use it to seal windows, door frames, bathtubs, showers, and so much more. Now, interior caulking is a piece of cake, but where things can get hard is when you want to do exterior caulking. - Source: Internet
- Sanding the surfaces is most commonly associated with woodwork, but even if your windows have metal frames, you should use a coarse material to remove the last bits of caulk. The choice between a brush or sanding paper is yours. As long as the last bits get removed, you are ready to clean and reapply caulk. - Source: Internet
- When removing silicone caulk from your skin or other surfaces, use rubbing alcohol and warm water. Denatured alcohol also works fine. As long as you remove it from your skin quickly, you won’t have to worry about it causing damage. - Source: Internet
- Tooling is the process of smoothing out caulk after it’s been applied. This important step ensures your job is effective and looks neat and professional. Your hands are often the best tool to use for this process. After applying a bead of caulk, run your finger along the bead to ensure it fills the gap. - Source: Internet
- Smooth the caulk bead using a damp finger, cloth, sponge or caulk smoothing tool. Leave enough caulk to bridge and adhere to both surfaces. Wipe the excess off your finger with a cloth or rinse it off in a bucket of water. - Source: Internet
- Caulk tends to harden as it ages, usually breaking away from its surface leaving moisture to accumulate beneath. Without sufficiently removing old caulk you risk leaving old moisture on the surface of the window. Use a putty knife or sharp tool to remove it. - Source: Internet
- Polyurethane caulk will last from 10 – 20 years, can be painted over and adheres well. Polyurethane spray foams are heavy duty and tend to expand as they dry. This is a common option for exterior window caulking. - Source: Internet
- If there are any bumps present at all, always try to work with them as opposed to moving against them. It’s a lot like moving with or against the grain of the wood when sawing. To create an even and flat caulk bead, pull your gun along with the bumps instead of trying to run a bead against them. - Source: Internet
- Bead Size: How thick do I apply it? The best rule of thumb is to use your finger to wipe down a caulk bead. Do NOT use a rag as it will wipe away too much caulk and lead to cracking. You don’t need to use more caulk, just don’t wipe away the product you have already used! Remember to moisten your finger before tooling the caulk. The moisture allows for a smoother finish. - Source: Internet
- Why don’t caulks “stick” sometimes? Caulks don’t stick to dust, chalk, dirt and other contaminants. Also remove any loose or damaged substrates. Washing an area and letting it dry before caulking can really improve adhesion. - Source: Internet
- A big mistake that many newbies make when sealing doors and windows with caulking is to only apply a single bead to the exterior. For the best weatherproofing, you do really need to apply a bead of caulking to both the interior and exterior seams. It’s the second layer of protection that will pay off big time in the long run. - Source: Internet
- To remove extra-hard caulk, you may choose to apply a caulk remover gel. Leave it on 2 – 3 hours to loosen caulk before scraping. Then clean the surface with a household cleaner or rubbing alcohol and ensure the surface is clean and dry before caulking. - Source: Internet
- The first step in removing caulk is to make sure it isn’t too stubborn. While you can remove caulk by using pliers and relying on your determination alone, you will spend an awfully long time doing so. If you’re working with glass windows, the longer you spend handling the region, the more likely you will damage the window. - Source: Internet
- The cracking of caulk has been a common topic on The Decorators Forum UK over the last few years, and decorators are always on the hunt for a caulk that ‘doesn’t crack’. After a hell of a lot of research and some personal experiments, I thought I would share my findings after getting to the bottom of this problem. You may also want to check out my Compatibility Test, which will help when choosing the brands of caulk use. - Source: Internet
- Ensure that all surfaces are completely cleaned, scraped, primed, patched, and sanded as needed. Surfaces should be clean, dry, and free of dirt, dust, loose flaking paint and loose caulking. (Be cautious to prevent slivers). - Source: Internet
- Interior caulking is used for cosmetic reasons. In new construction, joints between wood panels require caulking before painting. The same applies to gaps between drywall and wood, especially around casings and baseboards. - Source: Internet
- Silicone caulk is one of the three main varieties of caulk used to seal areas so that water, dust, and insects can’t pass through construction cracks. The reason it is relevant to this piece is because of its prominence in window sealing. If your interior windows feature a wooden frame, there is a high likelihood that the caulk you’re trying to remove is silicone caulk. - Source: Internet
- Inexpensive guns that use a racheting plunger tend to apply caulk unevenly, making the job look messy. Cut the nozzle of the caulk cartridge to your desired bead size, pierce the inside seal, then insert into the caulking gun. Seal cracks with caulk at an even, consistent pressure, holding the gun at a 45-degree angle. - Source: Internet
- Soak a cloth in rubbing alcohol or a similar solution. Place the wet rag on the caulk and let it slowly impact the surface across three days. Once the caulk is soft enough, proceed with the removal process. - Source: Internet
- There are different varieties of caulk for different purposes: polyurethane, stretchable types, acrylic, silicone, latex, paintable, etc. The best ones offer good flexibility, sometimes 25% and more. Considering the temperature variations we have in Toronto, there is a lot of expansion and contraction of building materials. The more flexible the caulk is, the better it will fill the gaps between moving materials. Some sealants are water resistant and some others can be exposed to occasional water submersion. - Source: Internet
- 100% silicone caulk or a mix of silicone and latex, is waterproof, flexible, shrink-proof and will last over 20 years. It is also commonly found in hardware stores. The downside of silicone caulk is that it cannot be painted and can give off a strong odour as it dries. - Source: Internet
 To get you started, here are some pointers to consider when searching for information regarding Paint cracking over caulk solutions:
- Do some research to find Do You Caulk Around Window Trim Inside-related information from reputable sources. This may include professional journalists, as well as online libraries and other websites.
- When looking for information regarding Caulking Before Painting, it is crucial to be aware of the various types of sources that can be found through electronic media. Some examples of these types of sites include Google and YouTube. There is also the possibility of obtaining information about Caulking Before Painting from various social media sites, such as Facebook and Twitter. This is another another potential source.
To get you started, here are some pointers to consider when searching for information regarding Paint cracking over caulk solutions:
- Do some research to find Do You Caulk Around Window Trim Inside-related information from reputable sources. This may include professional journalists, as well as online libraries and other websites.
- When looking for information regarding Caulking Before Painting, it is crucial to be aware of the various types of sources that can be found through electronic media. Some examples of these types of sites include Google and YouTube. There is also the possibility of obtaining information about Caulking Before Painting from various social media sites, such as Facebook and Twitter. This is another another potential source.Video | How To Apply Painters Caulk
Reading and doing research on the authenticity of each source are both essential if you want to discover the greatest information there is about 13 Exterior Caulking Tips You Need to Know. Your understanding of How To Soften Caulk For Removal will be improved by watching the many videos on How To Caulk Windows For Winter that are included in this page. These films come from a variety of different sources. Finding knowledge on a wide range of subjects is made much simpler by making use of the internet as a resource.
## Here are some crucial points concerning How To Re-Caulk Windows Inside:- How To Apply Painters Caulk
- How To Painters Caulk
- How To Remove Painters Caulk
- How To Apply Interior Caulking
- How To Remove Old Painters Caulk

You won’t have any trouble finding the information you’re looking for because there are so many websites and forums on the subject of Caulking and Painting: What DIYers Should Know.
When it comes to obtaining information on Caulking and Painting: What DIYers Should Know, the majority of individuals are more accustomed to using a different route. It enables a more in-depth look at the information regarding best way to apply painters caulk’s content and how it may be used, which is really helpful.

strategies to design information displays that are both aesthetically pleasing and functional that pertain to How To Remove Caulk From Shower. They are useful in commercial and marketing settings, and they can also be put to use to convey information on How To Remove Caulk From Shower. As a result, we also supply some photos pertaining to how do you apply painters caulk.
In summary, this article offers a comprehensive analysis of Paint cracking over caulk solutions. In addition, 13 Exterior Caulking Tips You Need to Know and Paint cracking over caulk solutions are mentioned here as a comparison of your knowledge regarding how to remove painters caulk.
